Posts

A Guide to Depth-First Search (DFS) Algorithm

In the realm of graph theory and algorithms, the Depth-First Search (DFS) algorithm stands as a fundamental and versatile tool. DFS is used to traverse and explore graph data structures, making it an essential technique for a wide range of applications, including pathfinding, cycle detection, topological sorting, and more. In this comprehensive guide, you will delve deep into the world of DFS, discussing its principles, applications, and providing practical code examples in Python.

Understanding Depth-First Search (DFS)

Depth-First Search, as the name suggests, is a graph traversal algorithm that explores as far down a branch of a graph as possible before backtracking. The primary idea behind DFS is to systematically visit nodes in a graph, marking them as visited and recursively exploring unvisited neighbors until there are no more unvisited nodes. This process allows DFS to traverse the entire connected component of a graph.

Key Components of DFS

Before we dive into code examples, let’s understand the essential components of the DFS algorithm:

  1. Stack (or Recursion): DFS typically employs a stack data structure to keep track of nodes to visit. Alternatively, recursion can be used, as it naturally emulates the behavior of a stack.
  2. Visited Set: To prevent revisiting nodes, a set or array is used to mark nodes as visited.
  3. Graph Representation: The graph to be traversed should be represented appropriately, commonly using an adjacency list or adjacency matrix.

DFS Algorithm Steps

The DFS algorithm can be broken down into the following steps:

  1. Start at a source node and mark it as visited.
  2. Explore an unvisited neighbor of the current node (if any).
  3. If there are unvisited neighbors, push them onto the stack (or make a recursive call) and repeat step 2.
  4. If there are no unvisited neighbors, backtrack to the previous node (pop from the stack or return from the recursive call).
  5. Repeat steps 2-4 until the stack is empty (or the recursion ends).

Applications of DFS

DFS has a wide range of applications in computer science and beyond:

  • Pathfinding: DFS can be used to find paths between two nodes in a graph, like finding a route on a map or the solution to a maze.
  • Cycle Detection: It is used to detect cycles in a graph, crucial in various applications, such as deadlock detection in operating systems.
  • Topological Sorting: In directed acyclic graphs (DAGs), DFS can be used to perform a topological sort, which is essential for tasks like scheduling.
  • Connected Components: DFS helps in identifying and counting the connected components within a graph.
  • Tree Traversal: When applied to trees (a specific type of graph), DFS can traverse a tree in different ways, including in-order, pre-order, and post-order traversals.

Now, let’s get practical and explore Python code examples for implementing the DFS algorithm.

Python Code Examples

DFS on an Adjacency List Graph

Suppose we have a graph represented as an adjacency list. We can implement DFS using a stack or recursion. Here’s an example using a stack:

def dfs(graph, start):
    visited = set()
    stack = [start]

    while stack:
        node = stack.pop()
        if node not in visited:
            print(node, end=' ') # Process the node (change this as needed)
            visited.add(node)
            stack.extend(neighbor for neighbor in graph[node] if neighbor not in visited)

Let’s break down the code:

  • We start with a stack containing the initial node (`start`).
  • We pop a node from the stack, visit it, mark it as visited, and push its unvisited neighbors onto the stack.
  • We repeat this process until the stack is empty.

DFS on an Adjacency Matrix Graph

If your graph is represented as an adjacency matrix, you can adapt the DFS algorithm accordingly. Here’s a Python example:

def dfs(matrix, start):
    n = len(matrix)
    visited = set()
    stack = [start]

    while stack:
        node = stack.pop()
        if node not in visited:
            print(node, end=' ') # Process the node (change this as needed)
            visited.add(node)
            neighbors = [i for i in range(n) if matrix[node][i] == 1 and i not in visited]
            stack.extend(neighbors)

In this code, we use a 2D binary matrix to represent the graph, where `matrix[i][j]` is 1 if there is an edge from node `i` to node `j`, and 0 otherwise.

Conclusion

Depth-First Search (DFS) is a powerful algorithm for traversing and exploring graphs in a systematic manner. Its versatility and wide range of applications make it an essential tool for solving various computational problems. By understanding the principles of DFS and practicing with code examples like the ones provided in this guide, you’ll be well-equipped to apply this algorithm effectively in your own projects and problem-solving endeavors. Happy graph exploration!

Understanding Quick Sort: A Divide and Conquer Sorting Algorithm

Sorting is a fundamental operation in computer science, used in various applications, from databases to search algorithms. There are numerous sorting algorithms, each with its own advantages and disadvantages. One of the most efficient and widely used sorting algorithms is Quick Sort.

Quick Sort is a comparison-based sorting algorithm that follows the “divide and conquer” paradigm. It was developed by Tony Hoare in 1960 and has since become a standard sorting algorithm due to its speed and efficiency. In this article, you’ll explore the inner workings of Quick Sort, understand its time complexity, and provide code examples in different programming languages.

How Quick Sort Works

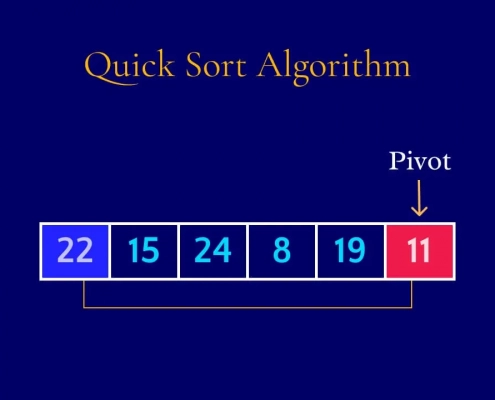
Quick Sort’s efficiency stems from its elegant and efficient divide-and-conquer strategy. The basic idea behind Quick Sort is to select a “pivot” element from the array and partition the other elements into two sub-arrays, according to whether they are less than or greater than the pivot. The sub-arrays are then recursively sorted.

Here’s a step-by-step breakdown of how Quick Sort works:

  1. Choose a Pivot Element: Select a pivot element from the array. The choice of the pivot can significantly affect the algorithm’s performance, but we’ll explore different pivot selection strategies later in this article.
  2. Partition the Array: Reorder the array elements so that elements less than the pivot come before elements greater than the pivot. The pivot itself is in its final sorted position. This process is known as partitioning.
  3. Recursively Sort Sub-arrays: Recursively apply Quick Sort to the sub-arrays on the left and right of the pivot until the entire array is sorted.
  4. Combine Sub-arrays: Since each sub-array is sorted, combining them in the correct order results in a fully sorted array.

Let’s dive into a code example to illustrate Quick Sort in action, using Python:

def quick_sort(arr):
    if len(arr) <= 1:
        return arr # Base case: an array with 0 or 1 elements is already sorted

    pivot = arr[len(arr) // 2] # Choose the middle element as the pivot
    left = [x for x in arr if x < pivot]
    middle = [x for x in arr if x == pivot]
    right = [x for x in arr if x > pivot]

    return quick_sort(left) + middle + quick_sort(right) # Recursively sort left and right sub-arrays

Now that we’ve seen how Quick Sort works conceptually and has a Python implementation, let’s delve into its time complexity and pivot selection strategies.

Time Complexity of Quick Sort

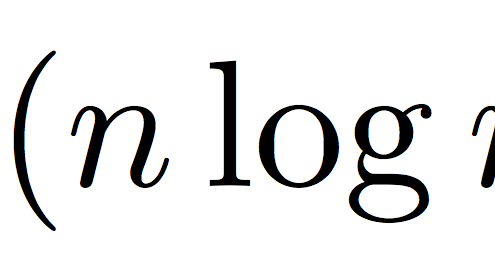
Quick Sort is known for its impressive average-case time complexity, making it one of the fastest sorting algorithms in practice. The average and best-case time complexity is O(n log n), where “n” is the number of elements in the array.

However, it’s crucial to note that Quick Sort’s worst-case time complexity can be O(n^2) if poorly chosen pivots consistently divide the array into unbalanced sub-arrays. To mitigate this issue, various pivot selection strategies and optimizations have been proposed.

Pivot Selection Strategies

  1. Random Pivot: Choosing a random element as the pivot can help avoid worst-case scenarios. By introducing randomness, Quick Sort’s performance becomes less predictable.
  2. Median-of-Three Pivot: Selecting the pivot as the median of the first, middle, and last elements of the array helps balance the sub-arrays and improves performance.
  3. Optimized Pivot Selection: More advanced pivot selection methods, like the “Introselect” algorithm, aim to choose the pivot intelligently based on the input data.

Implementing Quick Sort in Different Programming Languages

Quick Sort is a versatile sorting algorithm that can be implemented in various programming languages. Below, we provide code examples in JavaScript and C++ to demonstrate its cross-language applicability.

JavaScript:

function quickSort(arr) {
    if (arr.length <= 1) {
        return arr;
    }

    const pivot = arr[Math.floor(arr.length / 2)];
    const left = arr.filter(element => element < pivot);
    const middle = arr.filter(element => element === pivot);
    const right = arr.filter(element => element > pivot);

    return [...quickSort(left), ...middle, ...quickSort(right)];
}

C++:

#include <iostream>
#include <vector>

std::vector<int> quickSort(std::vector<int> arr) {
    if (arr.size() <= 1) {
        return arr;
    }

    int pivot = arr[arr.size() / 2];
    std::vector<int> left, middle, right;

    for (int element : arr) {
        if (element < pivot) {
            left.push_back(element);
        } else if (element == pivot) {
            middle.push_back(element);
        } else {
            right.push_back(element);
        }
    }

    left = quickSort(left);
    right = quickSort(right);

    left.insert(left.end(), middle.begin(), middle.end());
    left.insert(left.end(), right.begin(), right.end());

    return left;
}

int main() {
    std::vector<int> arr = {3, 6, 8, 10, 1, 2, 1};
    std::vector<int> sortedArr = quickSort(arr);

    for (int element : sortedArr) {
        std::cout << element << " ";
    }

    return 0;
}

Conclusion

Quick Sort is a highly efficient and widely used sorting algorithm that leverages the divide-and-conquer strategy to achieve impressive average-case time complexity. While its worst-case scenario can be inefficient, smart pivot selection strategies and optimizations help mitigate this issue. Quick Sort’s versatility allows it to be implemented in various programming languages, making it a valuable tool in a programmer’s arsenal for sorting large datasets efficiently. Understanding Quick Sort and its inner workings is essential for anyone dealing with sorting algorithms and performance optimization in computer science.

Understanding Merge Sort: A Divide and Conquer Algorithm

Sorting is one of the fundamental operations in computer science. It involves arranging elements in a specific order, often in ascending or descending order. There are various sorting algorithms, each with its own strengths and weaknesses. One of the most efficient and widely used sorting algorithms is Merge Sort. In this article, you will delve into the details of Merge Sort, exploring its principles, implementation, and performance.

Introduction to Merge Sort

Merge Sort is a comparison-based sorting algorithm that employs a divide-and-conquer strategy. This means it divides the input array into smaller sub-arrays, sorts them individually, and then merges them back together to produce a sorted array. The core idea behind Merge Sort is to repeatedly divide the unsorted list into smaller sub-lists until each sub-list contains a single element. Then, these sub-lists are merged back together in a way that maintains the order, creating a sorted output.

Merge Sort offers several advantages:

  1. Stable Sorting: Merge Sort is a stable sorting algorithm, which means that it preserves the relative order of equal elements in the sorted output. This property is essential in many applications, such as sorting database records.
  2. Predictable Performance: Merge Sort exhibits consistent performance, with a worst-case time complexity of O(n log n) for sorting an array of n elements. This makes it a reliable choice for sorting large datasets.
  3. Parallelizable: Merge Sort can be efficiently parallelized, taking advantage of multi-core processors or distributed computing environments. This makes it suitable for handling large datasets in modern computing scenarios.

The Merge Sort Algorithm

Merge Sort can be understood as a three-step process:

  1. Divide: The input array is recursively divided into smaller sub-arrays until each sub-array contains only one element. This is the base case of the recursion.
  2. Conquer: The individual sub-arrays are sorted. In the base case, sorting a sub-array of one element is trivial since it’s already sorted.
  3. Merge: The sorted sub-arrays are merged back together to produce a single, sorted array. The merging process ensures that the order of elements is preserved.

Pseudocode for Merge Sort

Before diving into the code implementation, let’s look at the pseudocode for Merge Sort:

MergeSort(arr):
    if length of arr <= 1:
        return arr

    // Divide the array into two halves
    mid = length of arr // 2
    left_half = arr[0:mid]
    right_half = arr[mid:end]

    // Recursively sort both halves
    left_half = MergeSort(left_half)
    right_half = MergeSort(right_half)

    // Merge the sorted halves
    return Merge(left_half, right_half)

Merge Function

The `Merge` function is responsible for merging two sorted sub-arrays into a single sorted array. Here’s the pseudocode for the `Merge` function:

Merge(left, right):
    result = []
    while left is not empty and right is not empty:
        if left[0] <= right[0]:
            append left[0] to result
            remove the first element from left
        else:
            append right[0] to result
            remove the first element from right

    // If there are remaining elements in left or right, append them
    append remaining elements in left to result
    append remaining elements in right to result

    return result

Implementation in Python

Now, let’s implement the Merge Sort algorithm in Python with code examples. We’ll create a recursive function `merge_sort` and a `merge` function to merge two sorted arrays.

def merge_sort(arr):
    if len(arr) <= 1:
        return arr

    mid = len(arr) // 2
    left_half = arr[:mid]
    right_half = arr[mid:]

    left_half = merge_sort(left_half)
    right_half = merge_sort(right_half)

    return merge(left_half, right_half)

def merge(left, right):
    result = []
    while left and right:
        if left[0] <= right[0]:
            result.append(left[0])
            left.pop(0)
        else:
            result.append(right[0])
            right.pop(0)

    result.extend(left)
    result.extend(right)
    return result

Let’s test the `merge_sort` function with an example:

arr = [38, 27, 43, 3, 9, 82, 10]
sorted_arr = merge_sort(arr)
print(sorted_arr) # Output: [3, 9, 10, 27, 38, 43, 82]

Performance Analysis

Merge Sort’s performance is remarkable, with a consistent time complexity of O(n log n) in all cases, whether the data is already partially ordered or completely random. This makes it suitable for a wide range of applications.

However, Merge Sort does come with some trade-offs:

  • Space Complexity: Merge Sort requires additional memory to store the sub-arrays during the merge phase. In the worst case, it can have a space complexity of O(n), which may not be suitable for sorting extremely large datasets with limited memory.
  • Slower for Small Arrays: For small input sizes, Merge Sort can be slower than simpler sorting algorithms like Insertion Sort or Bubble Sort. This is due to the overhead of recursion and merging.

Conclusion

Merge Sort is a highly efficient and versatile sorting algorithm based on the divide-and-conquer strategy. It offers stable sorting, predictable performance, and parallelizability. While it may have slightly higher space complexity and overhead for small input sizes, its O(n log n) time complexity makes it an excellent choice for sorting large datasets efficiently.

Understanding the principles and implementation of Merge Sort is valuable for any programmer or computer scientist. It serves as a fundamental example of a divide-and-conquer algorithm and is a building block for more complex algorithms used in various applications.

A Comprehensive Guide to Merge Sort and Quick Sort Algorithms

Sorting is a fundamental operation in computer science that involves arranging elements in a specific order, often in ascending or descending order. Two popular sorting algorithms are Merge Sort and Quick Sort. These algorithms offer efficient solutions to the sorting problem and are widely used in various applications. In this article, we will delve into the details of Merge Sort and Quick Sort, explore their implementations through code examples, and compare their strengths and weaknesses.

Merge Sort

Merge Sort is a divide-and-conquer algorithm that divides an array into two halves, recursively sorts each half, and then merges the sorted halves back together. The key insight of Merge Sort is that it’s easier to merge two sorted arrays into a single sorted array than to directly sort an unsorted array.

Implementation

Here’s a step-by-step breakdown of the Merge Sort algorithm in Python:

def merge_sort(arr):
    if len(arr) <= 1:
        return arr

    # Divide the array into two halves
    mid = len(arr) // 2
    left_half = arr[:mid]
    right_half = arr[mid:]

    # Recursively sort each half
    left_half = merge_sort(left_half)
    right_half = merge_sort(right_half)

    # Merge the sorted halves
    return merge(left_half, right_half)

def merge(left, right):
    result = []
    i = j = 0

    while i < len(left) and j < len(right):
        if left[i] < right[j]:
            result.append(left[i])
            i += 1
        else:
            result.append(right[j])
    j += 1

    result.extend(left[i:])
    result.extend(right[j:])

    return result

Complexity Analysis

  • Time Complexity: Merge Sort has a time complexity of O(n log n) in the worst, average, and best cases. This makes it highly efficient for sorting large datasets.
  • Space Complexity: Merge Sort has a space complexity of O(n) due to the need for temporary storage during the merge step.

Quick Sort

Quick Sort is another efficient divide-and-conquer sorting algorithm. It works by selecting a ‘pivot’ element and partitioning the array into two sub-arrays – elements less than the pivot and elements greater than the pivot. The sub-arrays are then recursively sorted. The key to the efficiency of Quick Sort is choosing a good pivot that evenly divides the array.

Implementation

Here’s a step-by-step breakdown of the Quick Sort algorithm in Python:

def quick_sort(arr):
    if len(arr) <= 1:
        return arr

    pivot = arr[len(arr) // 2]
    left = [x for x in arr if x < pivot]
    middle = [x for x in arr if x == pivot]
    right = [x for x in arr if x > pivot]

    return quick_sort(left) + middle + quick_sort(right)

Quick Sort can also be implemented in-place, which reduces the space complexity but requires more complex partitioning logic. Below is an in-place version:

def quick_sort_in_place(arr, low, high):
    if low < high:
        pivot_index = partition(arr, low, high)
        quick_sort_in_place(arr, low, pivot_index)
        quick_sort_in_place(arr, pivot_index + 1, high)

def partition(arr, low, high):
    pivot = arr[low]
    left = low + 1
    right = high

    done = False
    while not done:
        while left <= right and arr[left] <= pivot:
            left = left + 1
        while arr[right] >= pivot and right >= left:
            right = right -1
        if right < left:
            done= True
        else:
            arr[left], arr[right] = arr[right], arr[left]
    arr[low], arr[right] = arr[right], arr[low]
    return right

Complexity Analysis

  • Time Complexity: Quick Sort has an average-case time complexity of O(n log n), but in the worst case, it can degrade to O(n^2) if the pivot selection is consistently poor. However, randomized pivot selection or using a middle element as the pivot often mitigates this issue.
  • Space Complexity: Quick Sort generally has a space complexity of O(log n) due to its recursive nature. The in-place version further reduces the space complexity.

Comparison

Both Merge Sort and Quick Sort have their own advantages and disadvantages:

  • Stability: Merge Sort is a stable sorting algorithm, which means that equal elements retain their relative order after sorting. Quick Sort, when implemented with standard partitioning schemes, is not stable.
  • Space Complexity: Merge Sort has a higher space complexity due to the need for additional storage during the merge step. Quick Sort is more memory-efficient, especially the in-place version.
  • Performance: Merge Sort performs consistently well regardless of the input data distribution, making it a reliable choice. Quick Sort’s performance heavily relies on the pivot selection, and its worst-case behavior can be problematic for certain inputs.
  • Use Cases: Merge Sort is often used in external sorting scenarios where data doesn’t fit entirely in memory. Quick Sort is commonly used in practice when average-case performance matters more than worst-case performance.

Conclusion

Merge Sort and Quick Sort are two powerful sorting algorithms with different strengths and weaknesses. Merge Sort’s consistent performance and stability make it a reliable choice for various scenarios, while Quick Sort’s average-case efficiency and low memory usage make it a popular choice for in-memory sorting tasks. Understanding these algorithms and their implementations is essential for any programmer dealing with sorting tasks, as they provide efficient solutions to a fundamental problem in computer science.

Binary Search Algorithm: A Faster Path to Efficiency

Mastering Binary Search: A Comprehensive Guide with Code Examples

Searching is a core operation in computer science, enabling us to locate specific elements within a dataset efficiently. Among the plethora of search algorithms available, the Binary Search algorithm stands as a pinnacle of efficiency and elegance when it comes to finding elements in a sorted array. In this comprehensive guide, we will delve deep into the mechanics of the Binary Search algorithm, explore its benefits, analyze its time complexity, and provide extensive code examples in different programming languages to illustrate its implementation.

The Binary Search Algorithm Explained

At its heart, the Binary Search algorithm is based on a simple principle: dividing and conquering. It takes advantage of the fact that the input array is sorted and significantly reduces the search space in each iteration. The algorithm compares the middle element of the current search range with the target element and, based on this comparison, eliminates half of the remaining search space. This process repeats until the target element is found or the search range is empty.

Here’s a step-by-step breakdown of the Binary Search algorithm:

  1. Initialization: Begin with the entire sorted array as the search range.
  2. Midpoint Calculation: Calculate the index of the middle element in the current search range.
  3. Comparison: Compare the middle element with the target element.
  4. Adjustment: Based on the comparison, narrow down the search range to the left or right half of the current range.
  5. Repeat: Continue the process by recalculating the middle element and adjusting the search range until the target element is found or the search range becomes empty.

Key Insights into Binary Search

1. Efficiency

Binary Search is renowned for its efficiency. Its time complexity is O(log n), where n is the number of elements in the array. This logarithmic behavior means that Binary Search’s performance grows at a slower rate compared to linear search algorithms, making it particularly suitable for large datasets.

2. Sorted Array Requirement

It’s important to note that Binary Search only works on sorted arrays. This requirement stems from the algorithm’s core principle of repeatedly narrowing down the search range by comparing it with the middle element. Without a sorted array, this comparison loses its effectiveness.

3. Middle Element Calculation

Calculating the middle element’s index is crucial. The naive approach might be `(low + high) / 2`, but this could lead to an integer overflow. A safer way to calculate the middle index is `low + (high – low) / 2`.

Binary Search Implementation in Python

def binary_search(arr, target):
    low, high = 0, len(arr) - 1

    while low <= high:
        mid = low + (high - low) // 2
        if arr[mid] == target:
            return mid
        elif arr[mid] < target:
            low = mid + 1
        else:
            high = mid - 1

        return -1 # Target not found

# Example usage
sorted_array = [1, 3, 5, 7, 9, 11, 13, 15]
target_element = 9
result = binary_search(sorted_array, target_element)
if result != -1:
    print(f"Element found at index {result}")
else:
    print("Element not found")

Binary Search Implementation in C++

#include <iostream>
#include <vector>

int binary_search(std::vector<int>& arr, int target) {
    int low = 0;
    int high = arr.size() - 1;

    while (low <= high) {
        int mid = low + (high - low) / 2;
        if (arr[mid] == target) {
            return mid;
        } else if (arr[mid] < target) {
            low = mid + 1;
        } else {
            high = mid - 1;
        }
    }

    return -1; // Target not found
}

int main() {
    std::vector<int> sorted_array = {1, 3, 5, 7, 9, 11, 13, 15};
    int target_element = 9;
    int result = binary_search(sorted_array, target_element);
    if (result != -1) {
        std::cout << "Element found at index " << result << std::endl;
    } else {
        std::cout << "Element not found" << std::endl;
    }

    return 0;
}

Binary Search Implementation in Java

public class BinarySearch {
    public static int binarySearch(int[] arr, int target) {
        int low = 0;
        int high = arr.length - 1;

        while (low <= high) {
            int mid = low + (high - low) / 2;
            if (arr[mid] == target) {
                return mid;
            } else if (arr[mid] < target) {
                low = mid + 1;
            } else {
                high = mid - 1;
            }
        }

        return -1; // Target not found
    }

    public static void main(String[] args) {
        int[] sortedArray = {1, 3, 5, 7, 9, 11, 13, 15};
        int targetElement = 9;
        int result = binarySearch(sortedArray, targetElement);
        if (result != -1) {
            System.out.println("Element found at index " + result);
        } else {
            System.out.println("Element not found");
        }
    }
}

Binary Search Time Complexity Analysis

The time complexity of Binary Search is O(log n), where n is the number of elements in the array. This efficiency arises from the fact that in each step, the search range is halved. For example, in an array of size 8, Binary Search performs at most three comparisons (`8 -> 4 -> 2 -> 1`) to locate an element.

Conclusion

In the world of search algorithms, Binary Search reigns as an exemplar of efficiency and elegance. Its divide-and-conquer approach leverages the sorted nature of an array to swiftly zero in on the target element. By employing logarithmic time complexity and consistently reducing the search space, Binary Search excels even with massive datasets.

Whether you’re coding in Python, C++, Java, or any other language, a firm grasp of the Binary Search algorithm empowers you to tackle search-related challenges with confidence. Its principles, benefits, and implementations serve as a cornerstone of knowledge in the realm of computer science and programming.

Mastering Big O Notation: Understanding Algorithm Efficiency

The efficiency of algorithms is very important in the field of computer science and programming. Consider that there are two different ways to solve a problem; While both may give the correct result, one can take significantly longer to implement than the other. This is where Big O notation steps in, serving as a vital tool for measuring and comparing the efficiency of algorithms. In this article, you can learn to unravel the mystery of Big O notation, its importance, its applications, and how to decipher the cryptic symbols that often accompany it.

The Foundation: What is Big O Notation?

Big O notation is essentially a mathematical concept that provides a way to describe the performance or time complexity of an algorithm. It helps us understand how an algorithm’s runtime grows relative to the size of its input data. In simpler terms, Big O notation answers the question: “How does the runtime of an algorithm change as the input size increases?”

To better grasp this concept, let’s consider a common scenario: searching for an item in an array. For example, a linear search algorithm iterates through array elements one by one until it finds the target element or reaches the end of the array. This type of algorithm is said to have a linear time complexity, denoted as O(n), where ‘n’ represents the size of the input data (in this case, the array).

def linear_search(arr, target):
    for element in arr:
        if element == target:
            return True
    return False

However, not all algorithms perform in a linear manner. Some might exhibit more efficient behavior as the input size increases. This is where Big O notation comes into play. It helps programmers make informed decisions about which algorithm to use for a given problem by providing a standardized way to classify algorithms based on their efficiency based on input size.

The Notation: Breaking Down the Symbols

Big O notation is expressed using various symbols and terms that might seem intimidating at first glance. Let’s break down the most common ones:

1. O(1) – Constant Time Complexity:

Algorithms with constant time complexity have a consistent runtime, regardless of the input size. Imagine directly accessing an element from an array using its index. Whether the array contains 10 elements or 1,000, the time taken to access an element remains the same.

def access_element(arr, index):
    return arr[index]

2. O(log n) – Logarithmic Time Complexity:

Algorithms with logarithmic time complexity often divide the input data in half with each step. Binary search is a classic example. As the input size increases, the number of steps required to find the target item only increases logarithmically.

def binary_search(arr, target):
    low, high = 0, len(arr) - 1
    while low <= high:
        mid = (low + high) // 2
        if arr[mid] == target:
            return mid
        elif arr[mid] < target:
            low = mid + 1
        else:
            high = mid - 1
    return -1

3. O(n) – Linear Time Complexity:

Linear algorithms have a runtime that scales linearly with the input size. As mentioned earlier, a linear search is a prime example. If the input size doubles, the runtime also approximately doubles.

def linear_sum(arr):
    total = 0
    for element in arr:
        total += element
    return total

4. O(n log n) – Linearithmic Time Complexity:

Commonly seen in more advanced sorting algorithms like Merge Sort and Quick Sort, this complexity indicates that the algorithm performs slightly worse than linear, but still much better than quadratic algorithms, especially as the input size grows.

def merge_sort(arr):
    if len(arr) <= 1:
        return arr

    mid = len(arr) // 2
    left_half = arr[:mid]
    right_half = arr[mid:]

    left_half = merge_sort(left_half)
    right_half = merge_sort(right_half)

    return merge(left_half, right_half)

def merge(left, right):
    result = []
    left_index, right_index = 0, 0

    while left_index < len(left) and right_index < len(right):
        if left[left_index] < right[right_index]:
            result.append(left[left_index])
            left_index += 1
        else:
            result.append(right[right_index])
            right_index += 1

        result.extend(left[left_index:])
        result.extend(right[right_index:])

    return result

5. O(n^2) – Quadratic Time Complexity:

Algorithms with quadratic time complexity have runtimes that are proportional to the square of the input size. Nested loops that iterate through an array or matrix are classic examples. If the input size doubles, the runtime quadruples.

def bubble_sort(arr):
    n = len(arr)
    for i in range(n):
        for j in range(0, n - i - 1):
            if arr[j] > arr[j + 1]:
                arr[j], arr[j + 1] = arr[j + 1], arr[j]

6. O(2^n) – Exponential Time Complexity:

Algorithms with exponential time complexity have runtimes that grow exponentially with the input size. The infamous “brute force” approach to solving problems often falls under this category. As the input size increases, the runtime can quickly become unmanageable.

def fibonacci_recursive(n):
    if n <= 1:
        return n
    return fibonacci_recursive(n - 1) + fibonacci_recursive(n - 2)

7. O(n!) – Factorial Time Complexity:

The slowest of them all, algorithms with factorial time complexity have runtimes that grow at factorial rates with the input size. These are extremely inefficient and are usually avoided whenever possible.

def generate_permutations(elements):
    if len(elements) == 1:
        return [elements]

    permutations = []
    for i, element in enumerate(elements):
        remaining_elements = elements[:i] + elements[i+1:]
        for permutation in generate_permutations(remaining_elements):
            permutations.append([element] + permutation)

    return permutations

Applying Big O Notation in Real Life

Understanding Big O notation isn’t just an academic exercise—it has practical implications for developers. When faced with different algorithms to solve a problem, programmers can evaluate their efficiency using Big O notation and make informed choices. Choosing an algorithm with a lower time complexity becomes crucial when dealing with large datasets or time-sensitive applications.

Consider a scenario where you need to sort an array. If you have a small array, even an algorithm with quadratic complexity might run relatively quickly. However, as the array size grows, the difference in runtime between a quadratic and a linearithmic algorithm becomes significant. This is where the insight provided by Big O notation can guide your decision-making.

The Hidden Factors: Space Complexity and Real-world Considerations

While Big O notation primarily focuses on time complexity, there’s another dimension to consider: space complexity. Space complexity measures the amount of memory an algorithm uses relative to its input size. An algorithm that requires more memory might not be suitable for devices with limited resources.

Moreover, real-world factors can influence the choice of algorithm beyond theoretical complexity analysis. Programming languages, hardware architectures, and constant factors can all impact an algorithm’s performance. Therefore, it’s important to remember that Big O notation provides a high-level overview of an algorithm’s efficiency and not an absolute guarantee of its runtime.

Conclusion

Big O notation is a powerful tool that helps programmers analyze and compare the efficiency of algorithms. It provides a standardized way to classify algorithms based on their runtime behavior as input size changes. Understanding the symbols and terms associated with Big O notation empowers developers to make informed decisions when choosing algorithms to solve problems. However, it’s essential to remember that while Big O notation offers valuable insights, real-world considerations and practical constraints also play a significant role in algorithm selection. As you continue your journey in computer science and programming, let Big O notation be your guiding light to crafting efficient and optimized solutions.