Posts

Greedy Algorithms: Principles and Practical Applications

Greedy algorithms are a fundamental concept in computer science and mathematics, often employed to solve optimization problems by making locally optimal choices at each step. These algorithms are renowned for their simplicity and efficiency, making them an indispensable tool in various domains, including computer science, economics, and engineering. In this article, you’ll delve into the principles of greedy algorithms, explore their characteristics, and provide practical code examples to illustrate their application.

What are Greedy Algorithms?

A greedy algorithm is an approach to problem-solving that makes a series of choices, one at a time, with the goal of reaching an optimal solution. At each step, a greedy algorithm selects the best available option based on some predetermined criteria, without considering the global context or potential consequences of the choice in future steps. The key principle is to always make the locally optimal choice, hoping that the cumulative effect of these choices will lead to the best overall solution.

The term “greedy” implies that the algorithm exhibits a selfish behavior, always prioritizing the option that seems most advantageous at the moment, without considering the big picture. This characteristic simplifies the design and analysis of greedy algorithms, but it also introduces the risk of ending up with suboptimal or even incorrect solutions.

Characteristics of Greedy Algorithms

To understand and effectively utilize greedy algorithms, it’s essential to recognize their primary characteristics:

Greedy Choice Property

At each step of the algorithm, a greedy algorithm makes a choice that appears to be the best option at that moment. This choice is typically based on some objective function or criteria. The algorithm doesn’t consider future consequences; it only focuses on the immediate decision.

Optimal Substructure

Greedy algorithms often possess the optimal substructure property, which means that an optimal solution to the overall problem can be constructed from optimal solutions to its subproblems. This property simplifies the problem-solving process by allowing the algorithm to work incrementally.

Lack of Backtracking

Greedy algorithms usually don’t backtrack or reconsider previous choices. Once a decision is made, it’s final. Consequently, the algorithm’s efficiency and simplicity often come at the cost of potentially missing globally optimal solutions.

Greedy Algorithms May Not Always Be Optimal

While greedy algorithms work well for many problems, they do not guarantee finding the globally optimal solution for all problems. In some cases, they may lead to suboptimal solutions.

Common Applications of Greedy Algorithms

Greedy algorithms are widely used in a variety of real-world applications. Let’s explore some common scenarios where they excel:

1. Minimum Spanning Tree (MST)

  • Problem: Given a connected, undirected graph with edge weights, find the minimum spanning tree, a subgraph that includes all vertices with the minimum possible total edge weight.
  • Greedy Approach: Kruskal’s or Prim’s algorithm selects edges with the lowest weights while ensuring that no cycles are formed.
# Kruskal's Algorithm in Python
from heapq import heapify, heappop, heappush

def kruskal(graph):
    minimum_spanning_tree = []
    heapify(graph['edges'])
    parent = {vertex: vertex for vertex in graph['vertices']}

    while graph['edges']:
        weight, u, v = heappop(graph['edges'])
        if parent[u] != parent[v]:
        minimum_spanning_tree.append((u, v, weight))
        old_parent, new_parent = parent[u], parent[v]
        for vertex, p in parent.items():
        if p == old_parent:
        parent[vertex] = new_parent

    return minimum_spanning_tree

2. Huffman Coding

  • Problem: Compress a message by assigning variable-length codes to characters to minimize the total encoded message length.
  • Greedy Approach: Huffman coding assigns shorter codes to more frequent characters, resulting in efficient compression.
# Huffman Coding in Python
import heapq

def build_huffman_tree(data):
    heap = [[weight, [char, ""]] for char, weight in data.items()]
    heapq.heapify(heap)

    while len(heap) > 1:
        lo = heapq.heappop(heap)
        hi = heapq.heappop(heap)
        for pair in lo[1:]:
            pair[1] = '0' + pair[1]
        for pair in hi[1:]:
            pair[1] = '1' + pair[1]
        heapq.heappush(heap, [lo[0] + hi[0]] + lo[1:] + hi[1:])

    return sorted(heapq.heappop(heap)[1:], key=lambda p: (len(p[-1]), p))

3. Fractional Knapsack

  • Problem: Given a set of items with weights and values, determine the most valuable combination of items to fit into a knapsack of limited capacity.
  • Greedy Approach: Select items with the highest value-to-weight ratio until the knapsack is full.
# Fractional Knapsack in Python
def fractional_knapsack(items, capacity):
    items.sort(key=lambda x: x[1] / x[0], reverse=True)
    total_value = 0.0
    knapsack = []

    for item in items:
        if item[0] <= capacity:
            knapsack.append(item)
            total_value += item[1]
            capacity -= item[0]
        else:
            fraction = capacity / item[0]
            knapsack.append((item[0] * fraction, item[1] * fraction))
            total_value += item[1] * fraction
            break

    return knapsack, total_value

4. Dijkstra’s Shortest Path

  • Problem: Find the shortest path from a source node to all other nodes in a weighted graph.
  • Greedy Approach: At each step, select the unvisited node with the smallest tentative distance and update its neighbors’ distances.
# Dijkstra's Algorithm in Python
import heapq

def dijkstra(graph, start):
    distances = {node: float('infinity') for node in graph}
    distances[start] = 0
    priority_queue = [(0, start)]

    while priority_queue:
        current_distance, current_node = heapq.heappop(priority_queue)

        if current_distance > distances[current_node]:
            continue

        for neighbor, weight in graph[current_node].items():
            distance = current_distance + weight
            if distance < distances[neighbor]:
                distances[neighbor] = distance
                heapq.heappush(priority_queue, (distance, neighbor))

    return distances

Advantages and Limitations of Greedy Algorithms

Advantages:

  • Greedy algorithms are relatively easy to understand and implement.
  • They often provide efficient solutions to problems.
  • They are suitable for problems that exhibit the greedy choice property.

Limitations:

  • Greedy algorithms do not always guarantee an optimal solution.
  • The choice of the greedy criterion can greatly impact the result.
  • They may not work well for problems with complex constraints or when global optimization is required.

Conclusion

Greedy algorithms are a powerful and versatile tool for solving optimization problems. While they come with the risk of not always producing globally optimal solutions, their simplicity and efficiency make them valuable in a wide range of applications. Understanding the greedy choice property, optimal substructure, and the absence of backtracking is crucial when designing and analyzing these algorithms. Whether you’re working on finding minimum spanning trees, data compression, knapsack problems, or shortest path algorithms, the principles of greedy algorithms offer an elegant and practical approach to problem-solving.

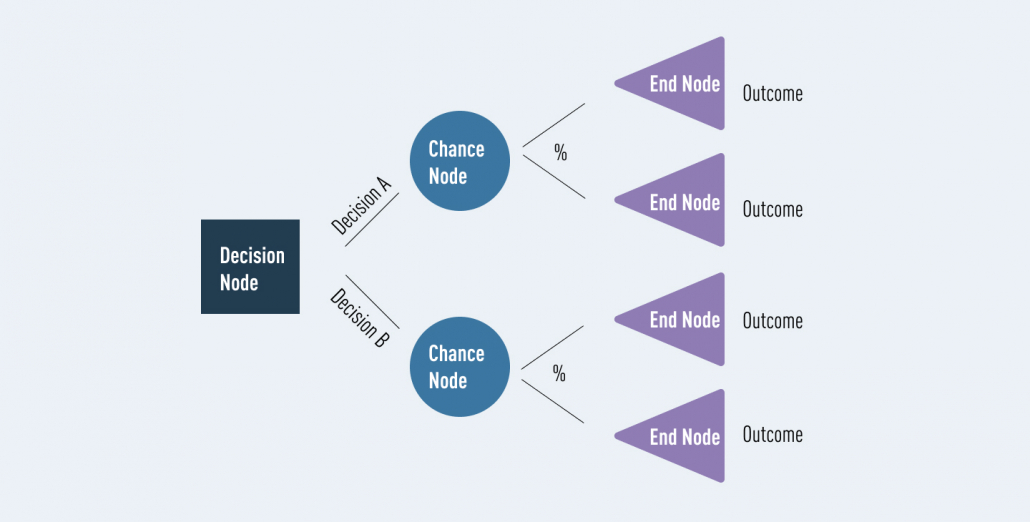
Understanding the Role of the Leaf Nodes in Decision Trees

Decision trees are a popular and versatile machine learning algorithm used for both classification and regression tasks. They provide an intuitive way to make decisions based on input features, making them a valuable tool in various domains such as finance, healthcare, and natural language processing. To truly grasp the power of decision trees, it’s essential to understand the role of their leaf nodes, also known as terminal nodes or leaves.

In this article, you will delve deep into the inner workings of decision tree leaf nodes, exploring their significance, how they make predictions, and their influence on the overall tree structure. We’ll also provide code examples in Python using the scikit-learn library to help illustrate key concepts.

Basics of Decision Trees

Before we dive into leaf nodes, let’s briefly review the fundamentals of decision trees. A decision tree is a tree-like structure where each internal node represents a decision or a test on an input feature, and each leaf node represents a class label (in classification) or a value (in regression). The goal of a decision tree is to partition the feature space into regions that are as pure as possible with respect to the target variable.

Here’s a simple example of a decision tree for binary classification:

IF Age <= 30
├── IF Income <= $50K
│ ├── Class: Yes
│ └── Class: No
└── IF Education = Bachelor's
├── Class: No
└── Class: Yes

In this tree, the internal nodes contain conditions based on features (e.g., Age, Income, and Education), and the leaf nodes contain the class labels (“Yes” or “No”).

Leaf Nodes: The End Decision Makers

Leaf nodes are the endpoints of a decision tree and play a crucial role in the decision-making process. When a new data point arrives for prediction, it traverses the tree from the root node to a leaf node following the conditions at each internal node. Once it reaches a leaf node, the decision tree assigns the class label or regression value associated with that leaf node to the input data point. This assignment is the final decision made by the decision tree.

Making Predictions with Leaf Nodes

Let’s see how leaf nodes make predictions with a simple example in Python using scikit-learn. We’ll use a synthetic dataset for binary classification.

from sklearn.tree import DecisionTreeClassifier
from sklearn.datasets import make_classification

# Create a synthetic dataset
X, y = make_classification(n_samples=100, n_features=2, random_state=42)

# Train a decision tree classifier
clf = DecisionTreeClassifier(random_state=42)
clf.fit(X, y)

# Sample input data for prediction
new_data = [[-0.5, 1.5]]

# Predict the class label for the new data point
predicted_class = clf.predict(new_data)
print("Predicted Class:", predicted_class[0])

In this code, we create a decision tree classifier and fit it to the synthetic dataset. Then, we provide a new data point (`new_data`) and use the `predict` method to determine the class label assigned by the decision tree. The class label assigned by the leaf node where the data point lands is the final prediction.

Impurity Reduction and Leaf Node Purity

Leaf nodes aim to minimize impurity or uncertainty in classification tasks. Impurity is a measure of how mixed the class labels are within a node. Common impurity measures include Gini impurity and entropy. Decision trees split the data at internal nodes to reduce impurity, and leaf nodes represent regions where impurity is minimized.

A pure leaf node contains only instances of a single class label (Gini impurity or entropy is 0). In contrast, an impure leaf node contains a mix of class labels, indicating uncertainty. Decision trees strive to create pure leaf nodes as they represent confident predictions.

Role of Leaf Nodes in Tree Structure

The structure of a decision tree heavily depends on the placement and organization of its leaf nodes. Leaf nodes influence various aspects of the tree, including its depth, complexity, and interpretability.

Depth and Complexity

The depth of a decision tree is determined by the number of levels of nodes from the root to the deepest leaf. When leaf nodes are placed closer to the root, the tree tends to be shallow and simple. Conversely, if leaf nodes are deep within the tree, it can lead to a deep and complex tree structure.

Balancing the depth and complexity of a decision tree is essential to avoid overfitting. Overfitting occurs when the tree captures noise in the training data, making it perform poorly on unseen data. Pruning techniques and controlling the maximum depth of the tree can help prevent overfitting and create more generalizable models.

Interpretability

Decision trees are prized for their interpretability, which makes them valuable in applications where understanding the model’s decisions is essential. Leaf nodes play a vital role in achieving this interpretability. Each leaf node corresponds to a specific decision or prediction, which can be easily explained in human terms.

By inspecting the conditions leading to a leaf node, domain experts can gain valuable insights into why a particular decision was made. For example, in a decision tree used for loan approval, a leaf node might indicate that a loan was approved because the applicant’s income was above a certain threshold.

Characteristics of Leaf Nodes

  1. Pure Leaf Nodes: A leaf node is considered pure if all the training samples that reach it belong to the same class (in classification) or have the same target value (in regression). Pure leaf nodes are ideal because they represent clear and confident predictions.
  2. Impure Leaf Nodes: An impure leaf node contains training samples from multiple classes (in classification) or has a mix of target values (in regression). These nodes represent uncertainty in predictions.
  3. Majority Class (Classification)**: In classification tasks, the prediction made at a leaf node is typically the majority class of the training samples that reached that node. For example, if 80% of the samples belong to class A and 20% to class B, the leaf node predicts class A.
  4. Mean Value (Regression)**: In regression tasks, the prediction at a leaf node is usually the mean (average) of the target values of the training samples that reached that node.

Now, let’s illustrate these concepts with some code examples using Python and scikit-learn.

Code Examples

Classification Example

from sklearn.datasets import load_iris
from sklearn.tree import DecisionTreeClassifier

# Load the Iris dataset
data = load_iris()
X, y = data.data, data.target

# Create a decision tree classifier
clf = DecisionTreeClassifier()

# Fit the classifier to the data
clf.fit(X, y)

# Visualize the decision tree (optional)
import matplotlib.pyplot as plt
from sklearn.tree import plot_tree
plt.figure(figsize=(12, 6))
plot_tree(clf, filled=True, feature_names=data.feature_names, class_names=data.target_names)
plt.show()

In this classification example, we create a decision tree classifier using the Iris dataset. The leaf nodes of the resulting tree make predictions based on the majority class of the training samples that reach them.

Regression Example

from sklearn.datasets import load_boston
from sklearn.tree import DecisionTreeRegressor

# Load the Boston Housing dataset
data = load_boston()
X, y = data.data, data.target

# Create a decision tree regressor
reg = DecisionTreeRegressor()

# Fit the regressor to the data
reg.fit(X, y)

# Visualize the decision tree (optional)
plt.figure(figsize=(12, 6))
plot_tree(reg, filled=True, feature_names=data.feature_names)
plt.show()

In this regression example, we create a decision tree regressor using the Boston Housing dataset. The leaf nodes of the resulting tree make predictions based on the mean value of the target values of the training samples that reach them.

Pruning to Optimize Leaf Nodes

Pruning is a technique used to optimize the structure of decision trees by removing nodes that do not contribute significantly to improving predictive performance. Pruning helps in simplifying the tree and avoiding overfitting.

One of the common pruning methods is cost complexity pruning, also known as minimal cost complexity pruning or alpha pruning. In this technique, a hyperparameter called alpha controls the amount of pruning applied to the tree. Smaller values of alpha lead to more aggressive pruning, resulting in simpler trees with fewer leaf nodes.

Let’s see how pruning affects the tree structure in practice with scikit-learn:

from sklearn.tree import DecisionTreeClassifier

# Create a decision tree classifier with alpha pruning
clf_pruned = DecisionTreeClassifier(random_state=42, ccp_alpha=0.025)
clf_pruned.fit(X, y)

In this code, we create a decision tree classifier with alpha pruning by setting the `ccp_alpha` hyperparameter to a non-zero value. This encourages the algorithm to prune the tree during training, resulting in a simplified tree structure with fewer leaf nodes.

Conclusion

Leaf nodes are the final decision-makers in decision trees, determining the class labels or regression values assigned to input data points. They play a critical role in minimizing impurity, influencing tree depth and complexity, and enhancing the interpretability of the model.

Understanding the role of leaf nodes is essential for effectively working with decision trees, whether you’re building, interpreting, or optimizing them. By grasping the significance of these nodes, you can harness the power of decision trees in various machine-learning applications while ensuring their robustness and interpretability.

Understanding the Role of Internal Nodes in Decision Trees

Decision trees are a powerful and widely used machine learning algorithm for both classification and regression tasks. They are known for their simplicity, interpretability, and effectiveness in handling complex decision-making processes. One of the fundamental components of decision trees that play a pivotal role in their functionality is the internal node. In this article, you will delve deep into understanding the role of internal nodes in decision trees, exploring their significance, and providing code examples to illustrate their operation.

The Role of Internal Nodes

Internal nodes are the decision-makers within a decision tree. Their primary purpose is to determine how to split the data into subsets by selecting a feature and a splitting criterion. The goal is to create subsets that are as pure or homogenous as possible concerning the target variable, making it easier to make accurate predictions.

Here’s how internal nodes function:

  1. Feature Selection: At each internal node, a feature from the dataset is selected based on certain criteria. Common criteria include Gini impurity and information gain (for classification) or mean squared error reduction (for regression). These criteria assess how well a feature separates the data into different classes or reduces prediction errors.
  2. Threshold Determination: Once a feature is chosen, the internal node must determine a threshold value. This threshold divides the data into two or more subsets based on whether the feature’s values meet the condition specified by the threshold.
  3. Data Splitting: The data is then partitioned into subsets based on the selected feature and threshold. Each subset corresponds to a branch emanating from the internal node.
  4. Recursive Process: The process of feature selection, threshold determination, and data splitting is repeated recursively for each subset, forming a hierarchical structure of internal nodes and leaf nodes. This hierarchy enables the decision tree to make decisions by traversing from the root node to an appropriate leaf node.

By following the decision path from the root node to a leaf node, we can determine the sequence of features and thresholds used to arrive at a prediction. This interpretability is a significant advantage of decision trees, particularly in applications where understanding the reasoning behind predictions is crucial.

Significance of Internal Nodes

Internal nodes are critical to the decision tree’s ability to make accurate predictions and capture underlying patterns in the data. Here’s why they are significant:

  1. Feature Importance: Internal nodes help identify the most informative features in the dataset. Features selected at higher internal nodes often have a more significant impact on the tree’s decision-making process, making them valuable for feature selection and data analysis.
  2. Data Partitioning: By dividing the data into subsets based on features and thresholds, internal nodes contribute to the creation of distinct decision paths. This partitioning process enhances the tree’s predictive power by focusing on subsets of data where the target variable exhibits more pronounced patterns.
  3. Interpretability: Decision trees are known for their interpretability. Examining the decision path from the root node to a leaf node allows users to understand which features are influential in making specific decisions. This interpretability is particularly valuable in applications where transparency and understanding the reasoning behind predictions are essential.

Code Examples Using scikit-learn

To better understand the role of internal nodes in decision trees, let’s walk through some code examples using the popular Python library scikit-learn. We will create a simple decision tree classifier and visualize it to observe how internal nodes make decisions.

# Import necessary libraries
import numpy as np
import matplotlib.pyplot as plt
from sklearn.datasets import load_iris
from sklearn.tree import DecisionTreeClassifier, plot_tree

# Load the Iris dataset
iris = load_iris()
X, y = iris.data, iris.target

# Create a decision tree classifier
clf = DecisionTreeClassifier()
clf.fit(X, y)

# Visualize the decision tree
plt.figure(figsize=(12, 6))
plot_tree(clf, filled=True, feature_names=iris.feature_names, class_names=iris.target_names)
plt.show()

In this code snippet, we perform the following steps:

  1. Import necessary libraries, including scikit-learn for building and visualizing the decision tree.
  2. Load the Iris dataset, a common dataset used for classification tasks.
  3. Create a decision tree classifier using scikit-learn’s `DecisionTreeClassifier` class.
  4. Fit the classifier to the dataset using the `fit` method.
  5. Visualize the decision tree using the `plot_tree` function, specifying that we want to fill the nodes with colors and provide feature and class names for better visualization.

The resulting visualization will display the decision tree, showing the root node, internal nodes, and leaf nodes. This visualization allows us to see how the tree makes decisions by splitting the data based on specific features and thresholds.

Conclusion

Internal nodes are a fundamental and crucial component of decision trees. They act as decision points within the tree, determining how the data should be divided based on selected features and thresholds. Their role in feature selection, data partitioning, and interpretability makes them essential for both accurate predictions and understanding the decision-making process.

By grasping the significance of internal nodes, you gain a deeper understanding of decision trees and their ability to handle complex decision-making tasks. Decision trees, with their clear structure and the influence of internal nodes, continue to be a valuable tool in various machine learning applications, providing insights into the intricate world of data-driven decision-making.

Understanding the Role of the Root Node in Decision Trees

Decision trees are a versatile and powerful machine learning algorithm widely used for both classification and regression tasks. At the heart of every decision tree lies the root node, a fundamental component that plays a pivotal role in the tree’s construction and the overall decision-making process. In this article, you will delve deep into the concept of the root node in decision trees, explore its significance, and provide detailed code examples to illustrate its critical function.

The Root Node: Gateway to Decision-Making

The root node is the initial node at the top of a decision tree. It serves as the starting point for all decision-making processes within the tree. Essentially, the root node represents the first feature or attribute upon which the entire dataset will be split. This initial split forms the foundation for the subsequent decision tree structure.

The primary objective of the root node is to identify the feature that provides the best separation of the data into distinct classes or values. This separation is typically based on a measure of impurity or information gain. Two commonly used impurity measures are Gini impurity and entropy. Let’s briefly explain these concepts:

  • Gini Impurity: Gini impurity measures the probability of misclassifying a randomly chosen element if it were labeled according to the class distribution in the data subset. A lower Gini impurity indicates better separation.
  • Entropy: Entropy quantifies the disorder or impurity in a dataset. In decision trees, it is used to measure the information gain achieved by splitting the data based on a particular feature. Lower entropy implies better separation.

The root node’s role is to assess all available features and select the one that maximizes information gain or minimizes impurity. Once the optimal feature is identified, the data is partitioned into subsets, and child nodes are created to continue the decision-making process for each subset.

Code Examples

To gain a deeper understanding of the root node’s significance, let’s explore some practical code examples using Python and the scikit-learn machine learning library. We’ll demonstrate both classification and regression scenarios.

Example 1: Decision Tree Classifier

In this example, we’ll use a Decision Tree Classifier to classify a dataset based on the well-known Iris dataset.

# Import necessary libraries
from sklearn.datasets import load_iris
from sklearn.tree import DecisionTreeClassifier
from sklearn.tree import export_text

# Load the Iris dataset
iris = load_iris()
X, y = iris.data, iris.target

# Create a Decision Tree Classifier
clf = DecisionTreeClassifier(random_state=42)

# Fit the classifier to the data
clf.fit(X, y)

# Print the decision tree structure
tree_rules = export_text(clf, feature_names=iris.feature_names)
print(tree_rules)

The output will display the decision tree structure, with the root node’s decision criteria at the top.

Example 2: Decision Tree Regressor

In this example, we’ll utilize a Decision Tree Regressor to predict Boston Housing Prices using the Boston Housing dataset.

# Import necessary libraries
from sklearn.datasets import load_boston
from sklearn.tree import DecisionTreeRegressor
from sklearn.tree import export_text

# Load the Boston Housing dataset
boston = load_boston()
X, y = boston.data, boston.target

# Create a Decision Tree Regressor
regressor = DecisionTreeRegressor(random_state=42)

# Fit the regressor to the data
regressor.fit(X, y)

# Print the decision tree structure
tree_rules = export_text(regressor, feature_names=boston.feature_names)
print(tree_rules)

In this example, you’ll observe the root node’s decision criteria prominently featured at the top of the tree structure.

Conclusion

The root node in a decision tree serves as the cornerstone of the entire decision-making process. It determines which feature to use for splitting the data, thus influencing the structure and predictive accuracy of the decision tree. By selecting the feature that maximizes information gain or minimizes impurity, the root node sets the stage for effective decision-making and accurate predictions.

In this article, we have explored the role and significance of the root node in decision trees. We’ve provided detailed code examples to illustrate its critical function in both classification and regression scenarios. Understanding the importance of the root node is essential for anyone working with decision trees, as it forms the basis for creating robust and accurate machine-learning models.

Mastering Decision Trees: A Guide with Practical Python Examples

Decision trees are a fundamental machine-learning technique used for both classification and regression tasks. They are intuitive, and interpretable, and can be valuable tools in various domains, from finance to healthcare and beyond. In this guide, you will explore decision trees in detail, including their principles, construction, evaluation, and practical implementation with code examples in Python.

Table of Contents

  1. Introduction to Decision Trees
  2. Anatomy of a Decision Tree
  3. Decision Tree Construction
    – Entropy and Information Gain
    – Gini Impurity
  4. Decision Tree Algorithms
    – ID3
    – C4.5 (C5.0)
    – CART
  5. Decision Tree Pruning
  6. Decision Tree in Practice
    – Data Preparation
    – Decision Tree in Python
    – Decision Tree Visualization
  7. Evaluation of Decision Trees
    – Confusion Matrix
    – Cross-Validation
    – Overfitting
  8. Advantages and Disadvantages
  9. Conclusion

1. Introduction to Decision Trees

A decision tree is a supervised machine learning algorithm that makes predictions by learning a hierarchy of if-else questions. It mimics the way humans make decisions by breaking down complex problems into a series of simpler decisions. Each node in the tree represents a decision, and each branch represents an outcome of that decision.

Decision trees are used in various applications, including:

  • Classification: Assigning an object to one of several predefined classes.
  • Regression: Predicting a continuous numeric value.

2. Anatomy of a Decision Tree

A typical decision tree consists of three main elements:

  • Root Node: The topmost node, which represents the initial decision.
  • Internal Nodes: Intermediate nodes that represent decisions.
  • Leaf Nodes: Terminal nodes that provide the final output or prediction.
Decision Tree Anatomy

Decision Tree Anatomy

3. Decision Tree Construction

Decision trees are constructed using a recursive process that selects the best feature to split the data at each node. Two popular metrics used for this purpose are Entropy and Gini impurity.

Entropy and Information Gain

Entropy measures the randomness or impurity of a dataset. In the context of decision trees, it quantifies the uncertainty associated with the class labels. Information gain, on the other hand, represents the reduction in entropy achieved by partitioning the data based on a specific feature.

import numpy as np

def entropy(y):
    """Calculate the entropy of a dataset."""
    unique, counts = np.unique(y, return_counts=True)
    probabilities = counts / len(y)
    return -np.sum(probabilities * np.log2(probabilities))

def information_gain(y, splits):
    """Calculate the information gain after a split."""
    total_entropy = entropy(y)
    weighted_entropy = sum((len(split) / len(y)) * entropy(split) for split in splits)
    return total_entropy - weighted_entropy

Gini Impurity

Gini impurity measures the probability of misclassifying a randomly chosen element from the dataset. It is calculated similarly to entropy but with a different formula.

def gini_impurity(y):
    """Calculate the Gini impurity of a dataset."""
    unique, counts = np.unique(y, return_counts=True)
    probabilities = counts / len(y)
    return 1 - np.sum(probabilities**2)

4. Decision Tree Algorithms

There are several algorithms for constructing decision trees, with some of the most well-known ones being ID3, C4.5 (C5.0), and CART.

ID3 (Iterative Dichotomiser 3)

ID3, or Iterative Dichotomiser 3, is one of the early decision tree algorithms used for classification. It builds a decision tree in a top-down, recursive manner by selecting the most informative attributes at each node to partition the data. ID3 measures attribute informativeness using “information gain,” which quantifies the reduction in uncertainty (entropy) in the class labels after splitting the data based on an attribute. It’s particularly suited for datasets with categorical attributes and can handle multi-class classification problems. However, ID3 is sensitive to small variations in the data, tends to favor attributes with many categories, and does not handle continuous numeric attributes directly. More advanced algorithms like C4.5 and CART have since evolved to address these limitations while retaining the core concepts of ID3.

C4.5 (C5.0)

C4.5 (also known as C5.0) is a decision tree algorithm developed by Ross Quinlan as an evolution of the earlier ID3 algorithm. It’s designed for both classification and regression tasks. C4.5 uses “gain ratio” as the splitting criterion instead of “information gain,” which helps address the bias of favoring attributes with many categories. This algorithm can handle categorical and continuous numeric attributes, making it more versatile. It also includes a mechanism for handling missing values, making it robust in real-world datasets. C4.5 constructs decision trees by recursively selecting the best attribute to split the data, and it can automatically prune branches to avoid overfitting, leading to more accurate and interpretable models.

CART (Classification and Regression Trees)

CART, or Classification and Regression Trees, is a versatile decision tree algorithm developed by Breiman et al. that can be used for both classification and regression tasks. CART employs “Gini impurity” as the splitting criterion for classification and “mean squared error” for regression, which measures the impurity or error associated with a dataset. It is capable of handling both categorical and continuous numeric attributes, making it suitable for a wide range of datasets. One notable feature of CART is its support for binary splits at each node, meaning it considers only two branches for attribute splits, simplifying the tree structure. Additionally, CART can automatically prune branches based on a cost-complexity measure, helping prevent overfitting and producing simpler and more interpretable trees.

5. Decision Tree Pruning

Decision trees are prone to overfitting, where they capture noise in the data rather than the underlying patterns. Pruning is a technique used to prevent overfitting by removing branches from the tree that do not provide significant predictive power.

Pruning involves setting a maximum depth for the tree, limiting the number of leaf nodes, or defining a minimum number of samples required for a node to be split.

6. Decision Tree in Practice

Let’s see how to implement a decision tree in Python using the scikit-learn library. We’ll use a popular dataset, the Iris dataset, for a simple classification task.

Data Preparation

from sklearn.datasets import load_iris
from sklearn.model_selection import train_test_split

iris = load_iris()
X = iris.data
y = iris.target

X_train, X_test, y_train, y_test = train_test_split(X, y, test_size=0.2, random_state=42)

Decision Tree in Python

from sklearn.tree import DecisionTreeClassifier

# Create a decision tree classifier
clf = DecisionTreeClassifier(random_state=42)

# Fit the classifier to the training data
clf.fit(X_train, y_train)

# Make predictions on the test data
y_pred = clf.predict(X_test)

Decision Tree Visualization

You can visualize the decision tree using Graphviz or export it as a text representation.

from sklearn.tree import export_text

tree_rules = export_text(clf, feature_names=iris.feature_names)
print(tree_rules)

7. Evaluation of Decision Trees

Evaluating a decision tree model is crucial to assess its performance. Common evaluation metrics include the confusion matrix, accuracy, precision, recall, F1-score, and ROC curves. Cross-validation helps estimate how well the model generalizes to unseen data.

from sklearn.metrics import confusion_matrix, accuracy_score, classification_report

# Evaluate the model
print("Confusion Matrix:\n", confusion_matrix(y_test, y_pred))
print("Accuracy:", accuracy_score(y_test, y_pred))
print("Classification Report:\n", classification_report(y_test, y_pred))

8. Advantages and Disadvantages

Advantages of Decision Trees:

  • Simple to understand and interpret.
  • Can handle both categorical and numeric data.
  • Require minimal data preprocessing.
  • Can be used for feature selection.
  • Perform well on complex tasks with deep trees.

Disadvantages of Decision Trees:

  • Prone to overfitting, especially with deep trees.
  • Sensitive to small variations in the data.
  • Can create biased trees with imbalanced datasets.
  • Greedy nature may lead to suboptimal solutions.

9. Conclusion

Decision trees are powerful tools for solving classification and regression problems. They are easy to understand, versatile, and can be a valuable addition to your machine learning toolbox. However, it’s essential to use them wisely,

Genetic Algorithm: Evolving the Perfect Sort

Sorting is a fundamental operation in computer science and plays a crucial role in various applications. Traditional sorting algorithms like Bubble Sort, Quick Sort, and Merge Sort have been extensively studied and optimized for efficiency. However, there’s an unconventional approach to sorting called the Genetic Algorithm that takes inspiration from the principles of natural selection and evolution to arrange elements in a desired order.

In this article, you’ll explore the Genetic Algorithm, understand its core concepts, and provide code examples in Python to implement and experiment with it.

Understanding Genetic Algorithms

Before diving into Genetic Sorting, let’s briefly explain the basics of Genetic Algorithms (GAs). GAs are a class of optimization algorithms inspired by the process of natural selection. They are used to find approximate solutions to optimization and search problems.

Here are the key components of a Genetic Algorithm:

  1. Population: A set of individuals (possible solutions to the problem) forms the population.
  2. Fitness Function: A function that assigns a fitness value to each individual, indicating how well it solves the problem. In Genetic Sorting, this function measures how close the arrangement of elements is to the desired order.
  3. Selection: Individuals are selected from the population to become parents based on their fitness. Individuals with higher fitness have a better chance of being selected.
  4. Crossover: Pairs of parents are combined to produce offspring. Crossover mimics genetic recombination, creating new individuals with a mix of their parents’ characteristics.
  5. Mutation: Random changes are applied to some individuals to introduce diversity into the population. This step prevents the algorithm from getting stuck in local optima.
  6. Termination: The algorithm stops when a termination condition is met, such as a maximum number of generations or when a solution of sufficient quality is found.

Now that we have a basic understanding of Genetic Algorithms, let’s dive into Genetic Sorting.

Genetic Sorting Algorithm

The Genetic Sorting Algorithm is a creative approach to sorting a list of elements. Instead of using traditional comparison-based sorting methods, Genetic Sorting employs the principles of evolution to reorder elements gradually. Here’s how it works:

  1. Initialization: Start with a population of randomly ordered lists. Each list represents a potential solution.
  2. Fitness Function: Define a fitness function that measures how close a list’s ordering is to the desired sorted order. One common fitness function is the number of elements in the correct position.
  3. Selection: Choose lists from the current population to serve as parents for the next generation. Lists with higher fitness values have a higher chance of being selected.
  4. Crossover: Combine pairs of parent lists to create offspring. The crossover operation could involve merging parts of two-parent lists to create a new list.
  5. Mutation: Introduce small random changes to some offspring lists to maintain diversity.
  6. Termination: Continue these steps for a specified number of generations or until a solution with the desired fitness is found.

Let’s see how this works in practice with Python code examples.

Python Code for Genetic Sorting

Here’s a Python implementation of the Genetic Sorting Algorithm for sorting a list of integers in ascending order:

import random

def fitness(arr):
    """
    Calculate the fitness of an arrangement by counting the number of
    elements in the correct position.
    """
    return sum(1 for i in range(len(arr)) if arr[i] == i)

def crossover(parent1, parent2):
    """
    Perform crossover to create an offspring.
    """
    # Choose a random crossover point
    crossover_point = random.randint(0, len(parent1) - 1)

    # Create the offspring by combining parent1 and parent2
    offspring = parent1[:crossover_point] + parent2[crossover_point:]

    return offspring

def mutate(arr, mutation_rate):
    """
    Apply mutation to an arrangement with a given probability.
    """
    for i in range(len(arr)):
        if random.random() < mutation_rate:
            j = random.randint(0, len(arr) - 1)
            arr[i], arr[j] = arr[j], arr[i]

def genetic_sort(arr, max_generations=1000, mutation_rate=0.01):
    """
    Sort an array using the Genetic Sorting Algorithm.
    """
    population = [random.sample(arr, len(arr)) for _ in range(100)]

    for generation in range(max_generations):
        population.sort(key=fitness, reverse=True)
        best_arrangement = population[0]

        if fitness(best_arrangement) == len(arr):
            # Found a perfect arrangement
            return best_arrangement

        # Select parents and create offspring
        parents = population[:10]
        offspring = [crossover(random.choice(parents), random.choice(parents)) for _ in range(90)]

        # Apply mutation to the offspring
        for arr in offspring:
            mutate(arr, mutation_rate)

        # Replace the old population with the new one
        population = parents + offspring

    # If no perfect arrangement is found, return the best arrangement
    return population[0]

# Example usage
arr = [5, 2, 9, 1, 5, 6]
sorted_arr = genetic_sort(arr)
print("Original Array:", arr)
print("Sorted Array:", sorted_arr)

In this code:

  • The `fitness` function calculates the fitness of an arrangement based on the number of elements in the correct position.
  • The `crossover` function combines two parent arrangements to create offspring.
  • The `mutate` function introduces random changes to an arrangement with a specified mutation rate.
  • The `genetic_sort` function is the main algorithm that initializes a population of random arrangements and iteratively evolves them until a perfect arrangement is found or a maximum number of generations is reached.

Conclusion

The Genetic Sorting Algorithm is a unique and unconventional approach to sorting that leverages the principles of genetic algorithms. While it may not be the most efficient sorting method for small lists, it demonstrates the power of evolutionary algorithms in solving complex problems.

Keep in mind that Genetic Sorting may not be practical for every day sorting tasks, but it serves as an excellent example of how computational techniques can draw inspiration from nature to solve problems. This algorithm showcases the versatility and creativity of algorithms in addressing a wide range of challenges in computer science and beyond.