Posts

How To Make Responsive Table?

Everyone uses tables in their sites, but the tables look very bad on mobile devices. Even if you set the width of the table to 100%, it will be reduced to a certain extent and the texts will be very small. It is not useful at all. In this article I will show you the responsive table.

HTML Codes

Simple sample table codes.

<table>
   <thead>
     <tr>
       <th>First Name</th>
       <th>Last Name</th>
       <th>Job Title</th>
     </tr>
   </thead>
   <tbody>
     <tr>
       <td>James</td>
       <td>Matman</td>
       <td>Chief Sandwich Eater</td>
     </tr>
     <tr>
       <td>The</td>
       <td>Tick</td>
       <td>Crimefighter Sorta</td>
     </tr>
   </tbody>
</table>

Css Codes

General css codes for tables. You can customize the style yourself.

/* 
General Table Styles
*/
table { 
  width: 100%; 
  border-collapse: collapse; 
}
tr:nth-of-type(odd) { 
  background: #eee; 
}
th { 
  background: #333; 
  color: white; 
  font-weight: bold; 
}
td, th { 
  padding: 6px; 
  border: 1px solid #ccc; 
  text-align: left; 
}

Css Codes For Responsive Design

With these CSS codes and the @media query, your table will become responsive. What you need to be aware of here is the css codes with the comment “Table Headers” at the end. These css codes add columns before each <td> element. You need to customize this for each table.

/* 
With this media query we make my table responsive under 760px width. 
At the same time, it will also work in 768px and 1024px resolutions, 
improving the look on devices such as iPads.
*/
@media 
only screen and (max-width: 760px),
(min-device-width: 768px) and (max-device-width: 1024px)  {

    /* Force table to not be like tables anymore */
    table, thead, tbody, th, td, tr { 
        display: block; 
    }
    
    /* Hide column headers (but not display: none;) */
    thead tr { 
        position: absolute;
        top: -9999px;
        left: -9999px;
    }
    
    tr { border: 1px solid #ccc; }
    
    td { 
        / * Make it behave like a line * /
        border: none;
        border-bottom: 1px solid #eee; 
        position: relative;
        padding-left: 50%; 
    }
    
    td:before { 
        / * Edit column as if header exists * /
        position: absolute;
        /* Make room for the title on the left */
        top: 6px;
        left: 6px;
        width: 45%; 
        padding-right: 10px; 
        white-space: nowrap;
    }
    
    /*
    Table Headers
    Add column headers for each <td> element
    You need to customize each table.
    */
    td:nth-of-type(1):before { content: "First Name"; }
    td:nth-of-type(2):before { content: "Last Name"; }
    td:nth-of-type(3):before { content: "Job Title"; }
    td:nth-of-type(4):before { content: "Favorite Color"; }
    td:nth-of-type(5):before { content: "Wars of Trek?"; }
    td:nth-of-type(6):before { content: "Porn Name"; }
    td:nth-of-type(7):before { content: "Date of Birth"; }
    td:nth-of-type(8):before { content: "Dream Vacation City"; }
    td:nth-of-type(9):before { content: "GPA"; }
    td:nth-of-type(10):before { content: "Arbitrary Data"; }
}

Result

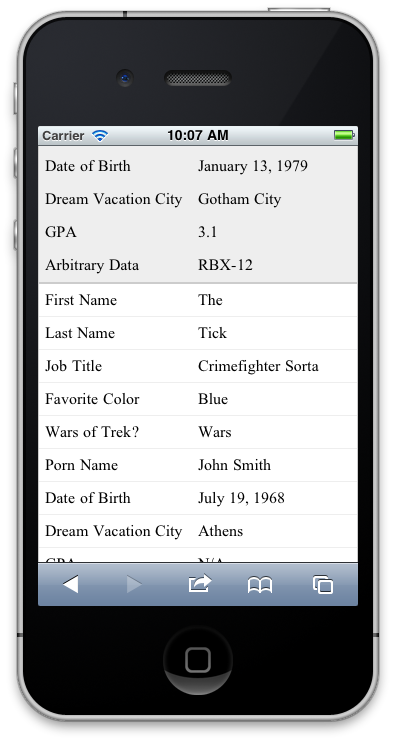
It will look like this under 760px width;
How to Add Social Share Buttons

In this article, I will tell you how to add social media sharing buttons. The theme you are going to add will not matter whether it’s html or WordPress. All of these codes are from the developers’ pages of the social media platforms. You can also look theirs site.

Facebook Share Button

In this code you need to change the value of the data-href = “” parameter. This should be a URL in the site. If you are using WordPress, you can type <?php the_permalink ()?>.

<div id="fb-root"></div>
<script>(function(d, s, id) {
var js, fjs = d.getElementsByTagName(s)[0];
if (d.getElementById(id)) return;
js = d.createElement(s); js.id = id;
js.src = "//connect.facebook.net/tr_TR/sdk.js#xfbml=1&version=v2.4";
fjs.parentNode.insertBefore(js, fjs);
}(document, 'script', 'facebook-jssdk'));</script>
<div class="fb-share-button" data-href="http://www.yourwebsite.com" data-layout="button_count"></div>

Tweet Button

In this code you need to change the value of the data-href = “” parameter. This should be a URL in the site. If you are using WordPress, you can type <?php the_permalink ()?>. You also need to change the value of the data-text = “” parameter. This should be a page title. If you want to add a shared via, you can type in the value of the data-via = “” parameter (for example your twitter username).

<div style="display:inline-block;vertical-align:top">
<a href="https://twitter.com/share" class="twitter-share-button" data-url="http://www.sitenizinurlsi.com" data-text="Sitenizin Başlığı"> Tweet</a>
<script>!function (d, s, id) { var js, fjs = d.getElementsByTagName(s)[0], p = /^http:/.test(d.location) ? 'http' : 'https'; if (!d.getElementById(id)) { js = d.createElement(s); js.id = id; js.src = p + '://platform.twitter.com/widgets.js'; fjs.parentNode.insertBefore(js, fjs); } }(document, 'script', 'twitter-wjs');
</script>
</div>

Pinterest Pin Button

You do not need to make any changes to it. You should not only forget that the JavaScript has to be added only once on the site.

<div style="display:inline-block;vertical-align:top">
<a href="//www.pinterest.com/pin/create/button/" data-pin-do="buttonBookmark" data-pin-color="red"><img src="//assets.pinterest.com/images/pidgets/pinit_fg_en_rect_red_20.png" /></a>
<script type="text/javascript" async defer src="//assets.pinterest.com/js/pinit.js"></script>
</div>

Linkedin Share Button

You do not have to make any changes here too.

<div style="display:inline-block;vertical-align:top">
<script src="//platform.linkedin.com/in.js" type="text/javascript"> lang: en_US</script>
<script type="IN/Share" data-counter="right"></script>
</div>

Google +1 Button

In this code you need to change the value of the data-href = “” parameter. This should be a URL in the site. If you are using WordPress, you can type <?php the_permalink ()?>.

<div style="display:inline-block;vertical-align:top">
<script src="https://apis.google.com/js/platform.js" async defer></script>
<a class="g-plusone" data-size="medium" data-href="http://www.sitenizinurlsi.com"></a>
</div>

Sitede Sağ Tıklamayı Önleme

Bazı arkadaşların sitelerinde sağ tıklamayı önlemek içni soru sorduklarını farkettim. Bunun için basit bir kod paylaşacağım ama bilgilendirme yapmak istiyorum. İçeriğin çalınması korkusu ile bunu yapıyorsanız eğer, bu konularda az bilgili birisi her türlü içeriğinize ulaşur. Sayfa kaynak dosları eninde sonunda ulaşılır durumdadır. Kodumuza geçelim. Aşağıdaki script kodunu sitenize ekleyin.

document.addEventListener("contextmenu", function(e){
 e.preventDefault();
}, false);

Responsive Tablo Yapımı

Herkes sitelerinde tablo kullanır fakat tablolar mobil cihazlarda çok kötü gözükmektedir. Tablonun genişliğini 100% olarak ayarlasanız bile belli bir yere kadar küçülecek ve yazılar çok ufak olacaktır. Hiç kullanışlı değildir. Bu yazımda size responsive tablo yapımını göstereceğim.

Html Kodları

Basit bir örnek tablo kodları.

<table>
   <thead>
     <tr>
       <th>First Name</th>
       <th>Last Name</th>
       <th>Job Title</th>
     </tr>
   </thead>
   <tbody>
     <tr>
       <td>James</td>
       <td>Matman</td>
       <td>Chief Sandwich Eater</td>
     </tr>
     <tr>
       <td>The</td>
       <td>Tick</td>
       <td>Crimefighter Sorta</td>
     </tr>
   </tbody>
</table>

Css Kodları

Tablolar için genel amaçlı oluşturduğumuz css kodları. Stili kendiniz özelleştirebilirsiniz.

/* 
Genel Stiller
*/
table { 
  width: 100%; 
  border-collapse: collapse; 
}
/* Zebra Çizgileri Stili */
tr:nth-of-type(odd) { 
  background: #eee; 
}
th { 
  background: #333; 
  color: white; 
  font-weight: bold; 
}
td, th { 
  padding: 6px; 
  border: 1px solid #ccc; 
  text-align: left; 
}

Responsive Css Kodları

Bu css kodları ve @media sorgusu ile tablomuz responsive hale gelecektir. Burada dikkat etmeniz gereken şey, en sonda “Tablo Başlıkları” yorumuna sahip css kodlarıdır. Bu css kodları sütun başlıklarını her <td> elementinin yazısının öncesine ekleme yapar. Bunu her tablo için özelleştirmeniz gerekmektedir.

/* 
Bu media query ile 760px genişlik altında tablomuzu responsive yaparız.
Aynı zamanda 768px ve 1024px çözünürlüğü arasında da çalışmasını sağlayarak,
Ipad gibi cihazlarda da görünümünü iyileştirmiş oluruz.
*/
@media 
only screen and (max-width: 760px),
(min-device-width: 768px) and (max-device-width: 1024px)  {

    /* Force table to not be like tables anymore */
    table, thead, tbody, th, td, tr { 
        display: block; 
    }
    
    /* Sütun başlıklarını gizle (display: none; ile değil ama) */
    thead tr { 
        position: absolute;
        top: -9999px;
        left: -9999px;
    }
    
    tr { border: 1px solid #ccc; }
    
    td { 
        /* Satır gibi davranmasını sağla */
        border: none;
        border-bottom: 1px solid #eee; 
        position: relative;
        padding-left: 50%; 
    }
    
    td:before { 
        /* Sütun başlığı varmış gibi düzenle */
        position: absolute;
        /* Sol tarafında başlık için yer aç */
        top: 6px;
        left: 6px;
        width: 45%; 
        padding-right: 10px; 
        white-space: nowrap;
    }
    
    /*
    Tablo Başlıkları
    Her bir <td> elementi için sütun başlıklarını ekle
    Her tablo için özelleştirmelisiniz.
    */
    td:nth-of-type(1):before { content: "First Name"; }
    td:nth-of-type(2):before { content: "Last Name"; }
    td:nth-of-type(3):before { content: "Job Title"; }
    td:nth-of-type(4):before { content: "Favorite Color"; }
    td:nth-of-type(5):before { content: "Wars of Trek?"; }
    td:nth-of-type(6):before { content: "Porn Name"; }
    td:nth-of-type(7):before { content: "Date of Birth"; }
    td:nth-of-type(8):before { content: "Dream Vacation City"; }
    td:nth-of-type(9):before { content: "GPA"; }
    td:nth-of-type(10):before { content: "Arbitrary Data"; }
}

Sonuç

760px genişlik altında tablomuz bu şekilde gözükecektir.

mobile-table

PHP Ders 1 – PHP Nedir?

Php sunucu taraflı çalışan bir programlama dilidir. 1995 yılında yayınlanmıştır ve o zamanki açılımı (Kişisel Web Sayfası) Personal Home Page’dir. Şimdi ise açılımı Hypertext Preprocessor.

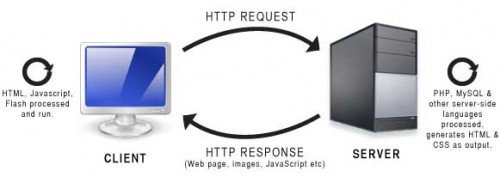
Sunucu taraflı çalışan demek, Html içine entegre edilmiş kodların istemcinin (tarayıcı vs) isteklerini sunucu tarafından işledikten sonra istemciye html olarak sunmaktır. İşlem tam olarak aşağıdaki gibidir;

Server-Vs-Client

Bilgisayarımız ile sunucuya bir istek (HTTP Request) göndeririz. Sunucu bu isteğe cevap vermeden önce isteğin olduğu sayfadaki Php kodlarını çalıştırır ve sonucunu bir Html sayfa olarak bize gönderir. Biz de tarayıcımızda görüntüleriz.

İlk örneğimizi yapalım;

<body>
<p>
Hello <?php echo "World"; ?>
</p>
</body>

<?php tagı Php kodlarının başladığını belirtir. ?> ise Php kodların bittiğini belirtir. Echo kodumuz ise ekrana tırnak işaretleri arasındakini yazdırmaya yarar. Echo “World”; yazdığımızda sayfa önizlemesinde Hello World gözükür. Php kodları gözükmez. Sayfa kaynağında da gözükmez. Çünkü sunucu Php kodunu işler ve Html kodu olarak istemciye geri dönüş yapar.

Php kodlarını gene php uzantılı dosyalarda çalıştırabiliriz. Aynı zamanda, sunucunun, Php dilini yorumlayabilmesi için, Php‘nin yüklü olması gerekmektedir.

Php çalışma ortamı oluşturmak için bilgisayarınıza php yüklemeniz gerekmektedir. Php yüklediğinizde, yazdığınız kodları terminalden çalıştırabilecek durumda olursunuz. Mesela “php program_dosyasi.php” gibi bir komutla çalıştırabilirsiniz. Fakat php, web ortamında çalışmak için uygun olduğundan, web sayfalarını görüntülemek için web sunucusu kurmanız gerekmektedir. Windows ortamı için XAMPP kurmanızı tavsiye ederim. İnternette kurulumu ile ilgili bir sürü kaynak bulabilirsiniz. Eğer ubuntu gibi linux dağıtımı kullanıyorsanız, ubuntu’ya lamp kurulumu yazımı okuyabilirsiniz.

Sonraki Ders: Php Ders 2 – Değişkenler

Sosyal Medya Paylaşım Butonları Nasıl Eklenir

Bu makalede temanıza sosyal medya paylaşım butonlarının nasıl eklenebileceğini anlatacağım. Ekleyeceğiniz tema ister html ister wordpress olsun farketmeyecek. Buradaki tüm kodlar sosyal medya platformlarının developers sayfalarından alınmadır. Oraya da bakabilirsiniz.

Facebook Paylaşım Butonu

Bu kodda data-href=”” parametresinin değerini değiştirmeniz gerekmekte. Orada site urlsi yazmalı. Eğer wordpress kullanıyorsanız <?php the_permalink() ?> yazabilirsiniz. 

<div id="fb-root"></div>
<script>(function(d, s, id) {
var js, fjs = d.getElementsByTagName(s)[0];
if (d.getElementById(id)) return;
js = d.createElement(s); js.id = id;
js.src = "//connect.facebook.net/tr_TR/sdk.js#xfbml=1&version=v2.4";
fjs.parentNode.insertBefore(js, fjs);
}(document, 'script', 'facebook-jssdk'));</script>
<div class="fb-share-button" data-href="http://www.sitenizinurlsi.com" data-layout="button_count"></div>

Twitter Tweet Butonu

Bu kodda data-href=”” parametresinin değerini değiştirmeniz gerekmekte. Orada site urlsi yazmalı. Eğer wordpress kullanıyorsanız <?php the_permalink() ?> yazabilirsiniz.  Aynı zamanda data-text=”” parametresinin değerini de değiştirmeniz gerekmekte. Orada da sayfa başlığı yer almalı. Eğer tweet içerisine via kısmı yani şu aracılığı ile paylaşılmıştır anlamına gelen bir yazı eklemek istiyorsanız data-via=”” parametresine içinde değeri (mesela twitter kullanıcı adınız) olacak şekilde yazabilirsiniz.  

<div style="display:inline-block;vertical-align:top">
<a href="https://twitter.com/share" class="twitter-share-button" data-url="http://www.sitenizinurlsi.com" data-text="Sitenizin Başlığı"> Tweet</a>
<script>!function (d, s, id) { var js, fjs = d.getElementsByTagName(s)[0], p = /^http:/.test(d.location) ? 'http' : 'https'; if (!d.getElementById(id)) { js = d.createElement(s); js.id = id; js.src = p + '://platform.twitter.com/widgets.js'; fjs.parentNode.insertBefore(js, fjs); } }(document, 'script', 'twitter-wjs');
</script>
</div>

Pinterest Pin Butonu

Bunda herhangi bir değişiklik yapmanıza gerek yok. Sadece şunu unutmamalısınız, orada eklenen javascript dosyası sayfada sadece bir kere eklenmiş olmalı.

<div style="display:inline-block;vertical-align:top">
<a href="//www.pinterest.com/pin/create/button/" data-pin-do="buttonBookmark" data-pin-color="red"><img src="//assets.pinterest.com/images/pidgets/pinit_fg_en_rect_red_20.png" /></a>
<script type="text/javascript" async defer src="//assets.pinterest.com/js/pinit.js"></script>
</div>

Linkedin Paylaşım Butonu

Burada da herhangi bir değişiklik yapmanıza gerek yok.

<div style="display:inline-block;vertical-align:top">
<script src="//platform.linkedin.com/in.js" type="text/javascript"> lang: en_US</script>
<script type="IN/Share" data-counter="right"></script>
</div>

Google +1 Butonu

Bu kodda data-href=”” parametresinin değerini değiştirmeniz gerekmekte. Orada site urlsi yazmalı. Eğer wordpress kullanıyorsanız <?php the_permalink() ?> yazabilirsiniz.

<div style="display:inline-block;vertical-align:top">
<script src="https://apis.google.com/js/platform.js" async defer></script>
<a class="g-plusone" data-size="medium" data-href="http://www.sitenizinurlsi.com"></a>
</div>

Portfolio Items